


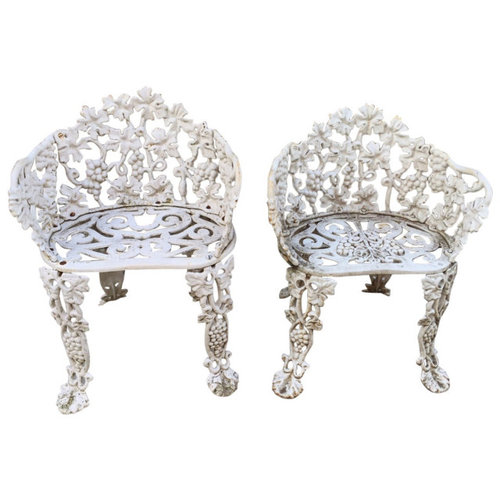
Any Way To Finish French Cast Iron Outdoor Chairs to Prevent Rust?
westes Zone 9b California SF Bay
2 years ago
last modified: 2 years ago
Featured Answer
Sort by:Oldest
Comments (10)

westes Zone 9b California SF Bay
2 years agoRelated Discussions
Cleaning rust off cast iron skillet, and what to cook in it?
Comments (25)Got reunited with CI a few years ago when I found 3 different size "name-brand" (Lodge, griswold, etc.) skillets for next to nothing at a yard sale. It took SEVERAL applications of oven cleaner to get the unknown GOOK off. I reseasoned like my Grandmother always did... HOT pan and a dab of bacon grease smeared all over... inside and out. As for cleaning, if cooking something "dry" like eggs... once pan was seasoned, only needed to be wiped out with paper towel. If something "wet"... scrape with metal spatula... HOT water, cheap salt and a scrubber. Then on burner till hot and another dab of BG. IMO, KEY to cast iron is USE IT!! I think it's easy to find... CHEAP at yard sales, thrift stores, flea markets... cuz it is HEAVY and some people think it's "old-fashioned"... they don't know what they're missing. When I first started "collecting" CI, stored several pieces in oven. Then noticed minor rust?? Figure from steam coming off whatever was cooking while pieces were sitting there. Just scrubbed it off, a little more BG... but I moved pieces to where I saw them everyday and then use them frequently....See Morecooking with cast iron
Comments (83)Here's how I season my large Jambalaya pots (AKA wash kettles, gypsy pots, hog pots).......some as large as 30 gallons. Clean the interior with Bar Keeper's Friend followed by a second water washing with Liquid detergent then a good rinsing. DO NOT skip this important step. Then warm your pot over an outdoor burner using a small flame. Then intent is to "warm" your pot on the bottom and sides and completely dry it. Allow your pot to slowly get HOT. Put a little lard (or Crisco shortening) in the pot and when it is melted.....CAREFULLY smear it completely around the pot....both inside and outside......using a wad of paper towels. Wipe off all excess lard....no puddles allowed. You only want a "thin" coating of lard. THIN is important. Then using a PROPANE torch heat the pot "evenly" and completely around it. After it gets hot all over....start working the torch in smaller areas...heating that "small area" to the smoking point of the lard. As you do this, you will see it turn black. Don't heat any longer after it turns black....move your torch to another adjacent area and repeat. Continue to keep your pot hot by heating completely around it with your torch....then focus on a smaller area again. Do not let your pot overheat in any one area to the point of where the seasoning flakes (or burns) off. It is important that you do not burn off the seasoning that you just laid down. The more you do this....the better the seasoning layers will develop. FYI, on a very large pot I use the kind of propane torch that they sell at Harbor Freight for de-icing driveway or for burning grass. For smaller pots I use a smaller propane soldering torch. To prevent future rust in storage and to help further develop its good seasoning layer. Coat the interior and exterior of your pot lightly with some melted lard (purchased stuff...not bacon fat). NEVER EVER coat your pot with regular cooking oil as IT WILL eventually get sticky, gummy, and go rancid. There is nothing worst than that rancid taste in your cooked food. You can prevent this from ever happening by simply using either Crisco shortening or purchased Lard for coating your pot between use. ......grapeseed oil is highly recommended for indoor oven seasoning (less smoking). Best of luck to you in your outdoor cooking adventures. Dan Semper Fi-cus...See MoreTips on caring for cast iron w/ electric stove?
Comments (22)Like Lou said, the oil/fat/lard is going to actually carbonize so it can be useful to use a fat with a low smoke point. I have used vegetable, olive oil sucessfully but you really have to bake it on to the pan. The pan is going to smoke like the devil if you're doing it right. A good testto see if you have a sufficient patina is that you should be able to cook an egg without oil and it won't stick. Here is what your pan should look like when you're done. Here is a fantastic post on seasoning cast iron" " acmorris Aug 23, 2007 02:30PM I'm answering a number of posts in this reply. You may want to get an 80 grit sand paper and scour the pot if it's new and unpolished, if you want to be 100% natural - use kosher salt. Your arms will appreciate the sand paper--much faster and less work. Unpolished is common with the brands you mentioned. Some brands also use a form of food wax for the initial season, nasty -- scrub it off. If you don't, you will notice over time that small chips appear that will be back filled with new carbon, giving a mottled texture. Think Waxed Paper (non stick), it doesn't adhere to metal, on the other hand, we've all scrubbed that brown goo from the bottom of pans (carbonized oil); and we know how well that adheres. Once you are ready to season, wash the pan well with soap, dry it on a burner. I've used cast iron for more almost 40 years, some of my cookware is twice as old as I am :) There is contention all over the web about what to use for seasoning, truth is just about anything. Vegetable Oils, corn in particular aren't the greatest since they take much longer to fully carbonize. They will work just as good as any other, but need near double the time in the oven to develop. Don't worry about sticky residues, explained below. Any Oil you have on-hand will work, I'm partial to Olive Oil or Crisco/Animal Fats, in that order. Olive Oil is natural and has been around longer than cast iron cookware, it predates by 1200-1400 years. Olive oil is also naturally antibiotic. Do NOT use cooking sprays for this purpose. Three reasons why pots come out sticky, and only three: 1. Oven temp too low. 2. Pan was not turned upside down so that puddles formed. 3. Not enough time was allowed for lubricant to complete the conversion to carbon. Things you need: 1. Take your pick from, Natural Bristle Pastry Brush, Paper Towel, Cloth Towel/Rag 2. Cookie Sheet lined with foil placed on Bottom Rack of Oven or an Oven Liner 3. Open windows if your oven doesn't vent outside. Seasoning Cast Iron does generate smoke similar to a cooking in a dirty oven. Turn on your oven to bake @ 500-550F Lightly coat your cast iron with your selection of lubricant. Do not allow any puddles to remain. Place the pan(s) on the top rack (not on the foil) for a few hours upside down until no more odor/smoke comes off the pan when you check on it. This takes a few hours. Repeat process until you have a nice black carbon layer. My usual on new or reseasoned cookware is 3-4 coats. Just until the pan turns carbon black or very near. If you can see a lot of color (grey, orange to brown etc), then the carbon layers aren't thick enough, reapply and bake it again. I just slide the rack out and brush on a new layer. Once you are satisfied, bake for an additional 3-4 hours to set the finish. Your cookware should be black or very near, glossy and not sticky or slimy. Your new seasoning can't be washed off, with the exception of using Lye. Avoid scrub pads of any kind for 3 months, use a vegetable brush if needed; at this point your cast iron will outlast your great-grand children. You can test your new carbon layer by toasting bread with your pan. If it doesn't stick, nothing will. You can even try this with high end non-stick cookware and find that the cast iron fares much better with this test. More about sticky pans: Your pan won't be sticky if the burn is complete. Sticky pots come from an incomplete burn of the oil layers. Rather than convert the oil to carbon, it's been rendered to tar. This is why some advocate not using vegetable oils (corn oil). Those oils have a high smoking point, and take longer to develop the carbon layer we are looking for. This can be fixed by baking your pan for several hours as described above. Dust, Lint, Food and all sorts of things will stick to your pans inside and out. Over time as the incomplete layers do carbonize; this debris will become part of your cookware's finish. I'm sure you've seen cast iron with bumpy areas, inside and/or out. Now you know what it is. Also, since this debris does settle into the glue like tarry oil, rinsing with water before use won't rinse it off. The only way to contend with this is to scrub down below where the offending material was introduced. Lubricating cold cookware before you put it away: Not a good idea, never has been, never will be. Lubricants do evaporate, they become tarlike. Debris and food will stick to the pan over time and result in a finish that is not smooth. For those people that will disagree with me on this, ever notice what the pan feels like after it's sat for a few days? Sticky? The cookware gets quite enough oil to maintain the carbon layer from simple use. Once your base layer is on, the maintenance is a continual process as another user stated. If you do a lot of no-fat cooking and the finish starts to turn grey, once it's dried on the burner, put two or three drops of oil in the pan and wipe it around with a paper towel/cloth. Let the pan heat up until it begins to smoke then remove from the heat. Care - there's many opinions on this one as well. If you use the high-heat method to season, no amount of dish soap is going to wash it off. It will however remove the oils from the surface, and your seasoning will wear down over time; since there is no maintenance. Water Only or Dish Soap is your personal choice, but if you do use soap, when the finish begins to grey just add a few drops of oil and smear it around, heat the pan and let it begin smoking, remove from heat. Avoid using cooking sprays for cast iron maintenance. These evaporate very fast and will result in the cookware having a gummy texture; attracting all sorts of debris that will become permanent in the carbon layer once enough heat is used. As for commentary about cooking eggs with no oil in cast iron, I do it all the time :) When that puppy's done, just slides right onto that toast!! It does take 8-16 hours to season a new piece. The lower the smoking point of the lubricant, the shorter the time. Any method that doesn't result in your cookware turning black, will result in foods that stick and an overall displeasure with cast iron."...See MoreSeasoning cast iron
Comments (26)Azzalea, after the first round they were brown but not at all sticky. The ones that were partly seasoned when I got them looked like the coating stuck well, but the two pieces that were unseasoned had only a brown sheen, maybe because the coating was thin? I seasoned them again tonight, at 350ð for almost 4 hours. The two pieces that started bare still aren't black but since they're for me I'll just start using them. Two of the others are for giving away but they look pretty good. One of the formerly bare pans seems to be for making some kind of donuts...it came with a recipe called "aebleskiver/munk" and you're supposed to add cooked apples or jam before turning them. While turning it over (with an oven mitt) to look at the coating on the hemispherical indents for the donuts, a finger on my bare hand grazed the hot metal, ow! Luckily it's just a 1/4-inch-square burn but after that I just turned the oven off because I'm tired of seasoning these pans. Do you all really get a good black coating with the 1-hour methods? Thanks for the advice all. I will probably shell out for Lodge pre-seasoned next time I need a skillet to own or give, but thanks to your help at least my corn sticks will stop sticking. Melissa...See Morewestes Zone 9b California SF Bay
2 years ago
Richard Dollard
2 years agolast modified: 2 years agowestes Zone 9b California SF Bay thanked Richard Dollardwestes Zone 9b California SF Bay
2 years ago
Related Stories
LIGHTINGCast a Spell With Outdoor Lights
Make a night on the patio magical or conjure a warm welcome for guests on the porch with well-chosen outdoor lighting fixtures
Full Story
GARDENING AND LANDSCAPING7 Ways to Create a Gorgeous Outdoor Room
Revel in the sights and scents of spring on a patio or in a garden corner decked out in comfy interior style
Full Story
GARDENING AND LANDSCAPING10 Ways to Open a Kitchen to the Outdoors
Have your cooking and your nice weather too, with a kitchen setup that embraces indoor-outdoor flow
Full Story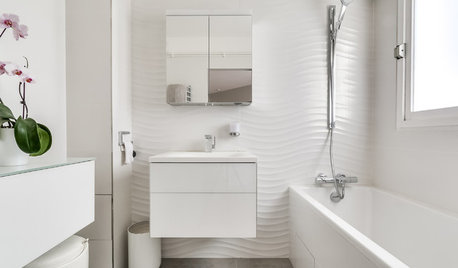
BATHROOM DESIGN12 Ways to Make Any Bathroom Look Bigger
These designer tricks can help you expand your space without moving any walls
Full Story
MOST POPULAR20 Outstanding Outdoor Living Rooms
Why give up style and comfort just because you add fresh air? Turn any porch or patio into a sumptuous room by following these leads
Full Story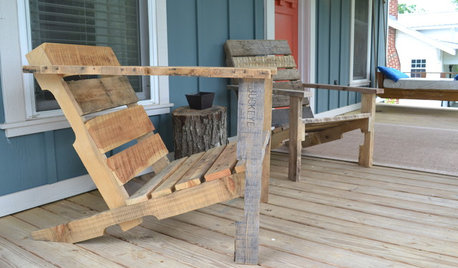
WOODWORKINGBuild Your Own Wooden Deck Chair From a Pallet — for $10!
Take the ecofriendly high road with a low-cost outdoor chair you make yourself
Full Story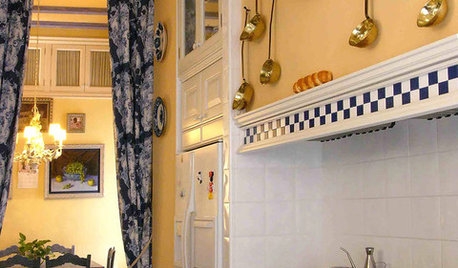
KITCHEN DESIGN9 Ways to Conjure a Parisian Bistro in Your Kitchen
Stir in some French flair with lighting, flooring and decor that may have guests requesting a menu
Full Story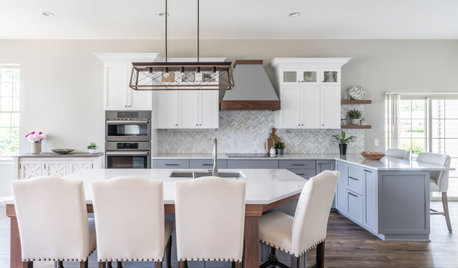
KITCHEN DESIGN10 Ways to Design a Kitchen for Aging in Place
Design choices that prevent stooping, reaching and falling help keep the space safe and accessible as you get older
Full Story
MOST POPULAR8 Ways to Improve Your Grill Setup
Rethinking the old grilling station? Here’s how to pack more function and style into your backyard cooking zone
Full Story
GARDENING AND LANDSCAPINGWhat to Know Before You Buy Teak Outdoor Furniture
Learn about finishes, weathering, care and that age-old oil debate to get the teak furnishings that suit you best
Full Story


beesneeds